← Back to Course
Connecting a Rain Sensor
🔌 Connecting a Rain Sensor to ESP32
🌧️ What You'll Learn:
- 🔌 Wire a rain sensor (FC-37/YL-83) to ESP32/ESP8266
- 📊 Read both digital (rain yes/no) and analog (rain intensity) signals
- 💧 Automatically skip irrigation when rain is detected
- 💰 Save 20-40% water by not watering before storms
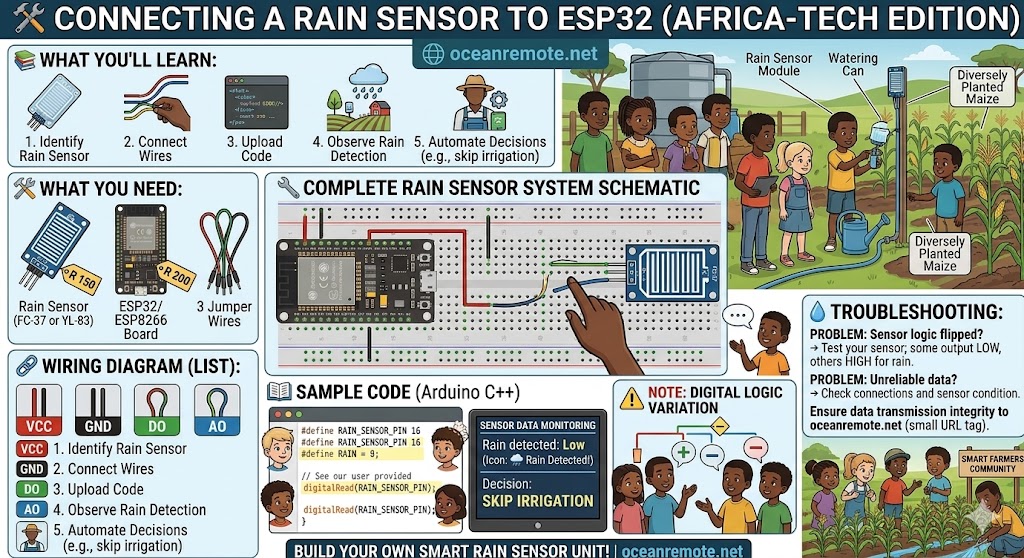
🛠️ Components You Need
- 🔹 Rain Sensor Module (FC-37 or YL-83) — $5-8 · Detects rain/water droplets
- 🔹 ESP32 or ESP8266 board — $8-12 · Brain of the system
- 🔹 3x Jumper wires (Female-to-Female) — $2 · For connections
- 🔹 Optional: Waterproof enclosure — $5 · Protects electronics outdoors
💡 Why Add a Rain Sensor?
Soil moisture sensors alone can't predict rain. A $5 rain sensor prevents over-watering before storms, saving 20-40% more water (up to 500,000 liters/year on a 10-acre farm).
🔗 Wiring Diagram
Rain Sensor FC-37 → ESP32
═══════════════════════════════════════════════════════════
VCC (red)     → 3.3V (or 5V on ESP8266)
GND (black)   → GND
DO (digital)  → GPIO16 (any digital pin)
AO (analog)   → GPIO34 (ADC pin - ESP32 only)

⚠️ ESP8266 users: AO not available (only one ADC pin A0)
   Use DO only, or connect AO to A0 on ESP8266
⚠️ Sensor Logic Alert:
Different rain sensors use opposite logic. Most FC-37 modules output LOW (0) when rain is detected. Some output HIGH. Always test your specific sensor first!
📖 Basic Rain Detection Code (Digital Only)
#define RAIN_SENSOR_PIN 16

void setup() {
    Serial.begin(115200);
    pinMode(RAIN_SENSOR_PIN, INPUT_PULLUP);
    Serial.println("🌧️ Rain Sensor Ready");
    Serial.println("=================================");
}

void loop() {
    int rainDetected = digitalRead(RAIN_SENSOR_PIN);

    // Most sensors output LOW when rain is detected
    // If yours outputs HIGH, swap LOW/HIGH in the if statement
    if (rainDetected == LOW) {
        Serial.println("🌧️ RAIN DETECTED! Skip irrigation.");
        // Add your irrigation skip logic here
        // digitalWrite(RELAY_PIN, HIGH); // Keep pump OFF
    } else {
        Serial.println("☀️ No rain. Check soil moisture normally.");
        // Normal irrigation logic here
    }

    delay(60000); // Check every minute
}
📖 Advanced Code (Digital + Analog - Rain Intensity)
#define RAIN_DIGITAL_PIN 16
#define RAIN_ANALOG_PIN 34

void setup() {
    Serial.begin(115200);
    pinMode(RAIN_DIGITAL_PIN, INPUT_PULLUP);
    Serial.println("🌧️ Advanced Rain Sensor Ready");
}

void loop() {
    int rainDigital = digitalRead(RAIN_DIGITAL_PIN);
    int rainAnalog = analogRead(RAIN_ANALOG_PIN);

    // Convert analog reading to intensity percentage
    // Dry: 4095, Wet: 0 (adjust based on your sensor)
    int intensity = map(rainAnalog, 0, 4095, 100, 0);
    intensity = constrain(intensity, 0, 100);

    Serial.println("=================================");
    Serial.printf("🌧️ Rain detected: %s\n", rainDigital == LOW ? "YES" : "NO");
    Serial.printf("💧 Rain intensity: %d%%\n", intensity);

    if (rainDigital == LOW) {
        if (intensity > 70) {
            Serial.println("⚠️ HEAVY RAIN! Skip irrigation for 24 hours.");
        } else if (intensity > 30) {
            Serial.println("🌧️ Light rain. Skip irrigation for 6 hours.");
        } else {
            Serial.println("💧 Light drizzle. Check soil before deciding.");
        }
    } else {
        Serial.println("☀️ No rain. Proceed with normal irrigation.");
    }

    delay(60000);
}
💡 Understanding Rain Sensor Output:
- Digital (DO): Trigger threshold adjustable via potentiometer on module
- Analog (AO): Gives continuous reading (0 = wet, 4095 = dry on ESP32)
- Intensity mapping: 0-30% = light rain, 30-70% = moderate, 70-100% = heavy
- Adjust threshold: Turn the blue potentiometer with a small screwdriver
🌟 Integration with Irrigation System:
// Add to your irrigation code
if (rainDetected == LOW) {
    Serial.println("🌧️ Rain detected - skipping irrigation");
    digitalWrite(RELAY_PIN, HIGH);  // Keep pump OFF
    delay(3600000);  // Wait 1 hour before checking again
    return;  // Exit loop early
}
// Normal irrigation logic continues here...
📖 Case Study — Rain Sensor Saves $600/Year, Zambia:
A 15-acre vegetable farm installed rain sensors on their automated irrigation system:
- 🌧️ Rainy season savings: Skipped 18 irrigation cycles (2 weeks of watering)
- 💰 Water savings: 360,000 liters saved during rainy months
- ⚡ Pump electricity saved: $180/year
- 💧 Prevented over-watering: No runoff or nutrient leaching
- 🌱 Healthier plants: Reduced fungal diseases from over-watering
"The $6 rain sensor paid for itself in the first month! I used to water every Tuesday regardless of weather. Now the system knows when it's raining." — Farmer, Lusaka Province
⚠️ Common Problems & Solutions:
- False triggers from morning dew: Add a 30-60 minute delay before acting on rain detection
- Sensor corrosion: The exposed copper traces corrode over time. Use a capacitive rain sensor or replace yearly
- Digital output always LOW/HIGH: Adjust the potentiometer or swap the logic in your code
- ESP8266 analog limitation: Only A0 pin supports analog. Use DO only or connect AO to A0
- Outdoor durability: Mount sensor at a slight angle for water runoff, clean monthly
💡 Pro Tips for Reliable Rain Detection:
- 📍 Mount sensor in an open area away from trees/roof overhangs
- 📐 Angle slightly (15°) so water drains off, not pools
- 🧹 Clean monthly with soft brush to remove dust/bird droppings
- 🔋 Add a 1-hour delay before resuming irrigation after rain stops
- 🌧️ Combine with weather forecast API for even better predictions
🎯 Key Takeaways:
- ✅ Rain sensors cost only $5-8 and save 20-40% water during rainy seasons
- ✅ Digital output (DO) tells you YES/NO rain; Analog (AO) tells you rain intensity
- ✅ Most sensors output LOW when rain is detected — test yours first!
- ✅ Always add a delay after rain stops (30-60 min) to prevent false triggers from dew
- ✅ Mount sensor at an angle outdoors for proper drainage
- ✅ A single rain sensor typically pays for itself in 1-2 months
💡 Key Takeaways:
- Apply these concepts directly to your farm or project.
- Take notes on important details for the quiz.
- Use the button below to track your progress.
×
![Enlarged view]()